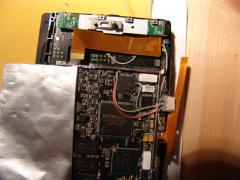
Providing the Maui with a serial port

(without success at the moment).


Update:

- I found the datasheet for USB.
- I was wrong on the AUDIO chip. It is a CPLD.
  The audio chip seems to be the little one the back (WM873). I'm not sure if this is the right datasheet.
- Thanks to "cr2" I now know that I have to look for the serial port directly on the CPU.

Background:

My Kernel still won't boot and I found no way to get any information of what goes wrong. So I decided to disassemble
the Maui to take a closer look at the hardware and find a chip which could provide my with the highly desired COM1
port. As I am not much a hardware specialist I asked a good friend of mine for help. The project could not have be
done without him. Many, many thanx to "caetwiesel" :-))

Disassembling:

The last time I opened the Maui, I found that the display was taped to motherboard. As I did't want to break up
anything at that point, I went no further. This time I decided to take the risc and broke the tape seal of the display.

Here the picture story (click on a thumb for a larger view):

Behind the display.

Opening the aluminum cover.

Soldered the connection cable.

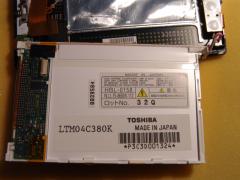
Trouble with the display.
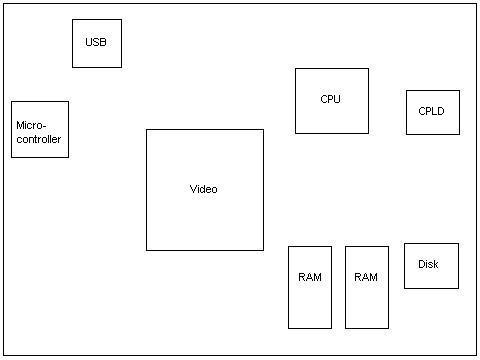
After breaking the display tapes we found an aluminum cover over the motherboard. There was no way opening it
without destoying it, so we decided to cut the cover on three sides, so we could flip the cover back and forth.

Behind the cover we finally found the motherboard and could take a closer look at the chips. This is what we found:


USB ISP1161A1
CB8602
TP0337
E
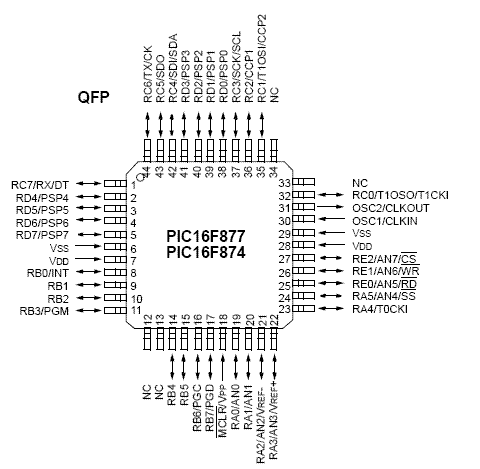
Microcontroller
(keyboard?)
MICROCHIP
PIC16LF874
04/PT
035SE
Video EPSON
S1D16806F00A1
F03360222
CPU PXA250B2C400
L2280144
Intel 01
2281059b
228Korea
CPLD R3032XL
E10402-245
Phillipines
CS48 10C
Disk MSYSTEMS
DISKONCHIP P160
MD3334 0615V3
JAPAN046
RAM (2 Chips) SAMSUNG 352
K45511533C-YN80
DK046P2Korea


The serial port (the wrong way!):

We did some searching for datasheets and found the datasheet for the microcontroller.

This was the most promissing picture we found in the datasheet:


We decided to solder three cables to the chip. Pin 44 for TX, pin 1 for RX and pin 29 for ground. To keep the maui
usable we placed a 3 pin plug behind the antenna. Therefor we had to remove a plastic placeholder. To get the plug
accessable we had to break a hole in "semi infrared" part of the chassis (the real infrared is the small one beside).

After putting everything together the display would not come up. Big trouble. We found out that the display needed some
pressure on the bottom left side of the display to come up (now we knew what the tapes were for). It took quite a lot of
"trail and error" to bring the display back alive, but finaly we got the right point.

Now we couldn't wait to see our new serial port in action. We tried to connect to COM1 under Windows CE with this
nice little tool: tty.exe. But no success. COM1 can't be opened :-(((((( Also booting the linux kernel does not open
COM1.

Of course we used a cross cable, but we also tried a straight cable. No luck.

Now I know to look for COM1 directly on the CPU, we will try that next. I hope to bring news soon.

Any comments are welcome at maui@m-scene.de.

Lets have fun on Maui ...
Chris

Back to "Linux on the Vodofone Power Handheld (bSquare Maui)"


Last update: 12.03.2006